Dlink DIR650 Router is an attractive, high-performance router which allows you to connect internet speed and Internet connection across all of your devices. It allows you to share your Internet connectivity via wireless and wired devices. It offers high-end security using WPA along with firewall. Configuration and setup is extremely simple and is based on the internet browser. Connect to your broadband modem and then use the internet-based wizard to guide you step-by-step through the configuration procedure. This guide will aid you through the configuration process for the Dlink router. Follow the steps listed below to set up your D-Link router..
1. Connect your computer to the Dlink DIR650 Router. (dlinkrouter.local)
The first step is to must unbox your DLINK the DIR650 router and then turn it on.
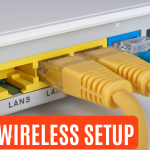
Attach the Act Internet cable into the Internet port on the router.
The router is likely to have an extra cable. Take the one end of the LAN cable to connect the 1 end on to the Ethernet port on the router, and connect another end to your PC or laptop
In the system, hold the Windows key and then R to open the run dialog box.
Enter ipconfig on your black display. The default gateway for the network as well as the Ethernet adapter should be set to the router’s address.
1.1Connect your mobile to the Dlink DIR650 router.
To connect your mobile device, follow the steps listed below.
Turn on the router and connect the ACT Internet cable to the Internet port on the router.
Then turn on WiFi via the settings on the phone to wait for a while until your phone detects the router’s name. Click the router’s name to connect.
If your router has been set up that the password for WiFi is already known,, you can go to the settings on your mobile
Select “wi-fi” under “Wireless and networks”.
The mobile will detect the name of the router. Then press the router’s name, if asked, and then input the password for WiFi, then press connect.
Note Each router configuration comprises two components. In the Internet part will tell that router to join the Internet and, while setting up for the WiFi component, we select which name we want to use and the password that we can connect the router using PPPoE.
This allows you to browse on the Internet without any hassle, and you won’t have to log in again.
WiFi configurations have also been provided, to make it easier for the process of connecting to the router.
The process of creating passwords and SSIDs has been explained
Only a few high-end routers come with two bands to operate on, which is 2.4 5 GHz and 2.4. The Dlink router is equipped with both bands.
2.4 GHz Band will give you with greater range but less speed
5 GHz provides smaller range, but a higher speed
Altering the WiFi channels will assist you in reducing issues with slow speeds
2 Logging on to your router
Start a web browser and enter the IP address below within the address box. The login screen will be displayed. Users will be able to find specific usernames and passwords listed below.
If the above mentioned credentials do not work, examine the back of the router, where the username as well as the password for the router will be listed.
2.1• Connecting to the router
The username will be admin, while the field for password is empty.
- 2.2The homepage of the interface on the internet that you have installed on the Dlink DIR650 Router should be displayed.
- 2.3-Now click the ‘Connect’ button from the drop-down menu of the homepage.
- 2.43. Under click n connect, select the service by name’manually’. Then click next.
- 3 Internet connectivity Choose the connection type as PPPoE.
- 3.13. Internet connectivity – PPPoE ConfigurationPPPoE Configuration Enter the username supplied by ACT and the password supplied by ACT. Next, click on.
- 3.23.2 Internet Connectivity- PPPoE configuration- The PPPoE session has been created. Click on”Apply.
- 4. Wi-Fi connectivity– Router’s SSID/Password configuration: Select an access point from the wireless network option and click the following icon. Enter any name for the Dlink DIR650 router under SSID . Click next. Select protected under security authentication, and then press enter. Choose any eight-character password from the network key and click next. Choose 2.4 5GHz or 2.4GHz under the WiFi Basic Settings. Then, enter the desired channel that is appropriate for the location within the associated SSID, and select apply. Choose the correct channel according to the specifics of the premises.
- 5 Saving Configuration You must now save the entire configuration by selecting the System icon and then clicking save.
- 6. Firmware upgrade (If necessary)- You can now upgrade the firmware on the Dlink DIR650 router. You can download an Dlink firmware version, and then upload it offline or to download directly from Internet the router itself.
- 7 Channel change (as and when needed) Channels are the channel through the router sends signals to devices. There are a variety of channels you can select from, according to the frequencies at which the router operates and the location of your.
Modifications that can be made following the configuration
- When the password for WiFi has changed, we must change the passwords for all devices so that they can be connected to the Internet.
- The computer or laptop will change in accordance with the WiFiChanges in laptop or computer according to the WiFi
- Windows 7- Windows button>Click on the control panel > select the Internet and Network tab and click on the sharing and network center
- Select “manage WiFi Scan” in the task pane.
- Right-click the name of the router and click Remove Network> click OK.
- Click on the icon for network and then click on the name of the router. Enter the new password for WiFi and connect.
3. Win 8 8.1 Win 8, 8.1 Click on the icon of the network located on the right side of the bottom, near the time of system. Select the name of the router and then select forget this network. Once again, click on the name of the router then input the updated WiFi password and then connect.
4. Win 10 Click on the icon for network located in the lower right-hand corner, next to the system’s time, and then select the network settings from the menu under WiFi. Then, click on Manage known networks icon and then click the name of your router and select forget. Then once more choose the network icon and select the router’s name. Then enter your brand current WiFi login and then join.
5. Tablet or mobile Open the settings of your mobile and then turn on WiFi. Press the router’s name long and then press leave the network. Repeat press the router’s name. After that, enter the password and then connect.
Now you’ve completed the setting up on you Dlink router. If you’re surfing the web from your desktop or relaxing on the sofa using you laptop router is always connected, no matter where you are. The antennas that are external to the router can increase the coverage of your wireless network to help you stay clear of dead zones and enjoy reliable connectivity in many areas all over your home. To set up your router, you must follow the instructions provided by the manufacturer when you purchase the item.